Sunday 5 August 2012

Project on the go - 2 Cloaklet with bead trim

And the second project is a beaded cloaklet for Mistress Portia.

Portia emailed me a very pretty picture and dared me to :)


Which with me can be a really bad idea. Portia was looking for a way of displaying her tokens and awards in a way that both showed them off, and stood alone. So the plan is to adapt this cloaklet to that end. Instead of the embroidered red flowers in the centre of each diamond we will attach a token or award.

The Planning


I've been doing my head in over the past few days working out the pattern and bead maths for this. It is suprising how accurate they seem to be now that I am doing the test piece.

My plan of attack has been to do the trim first. Partly because this will dictate the diameter of the cloaklet.

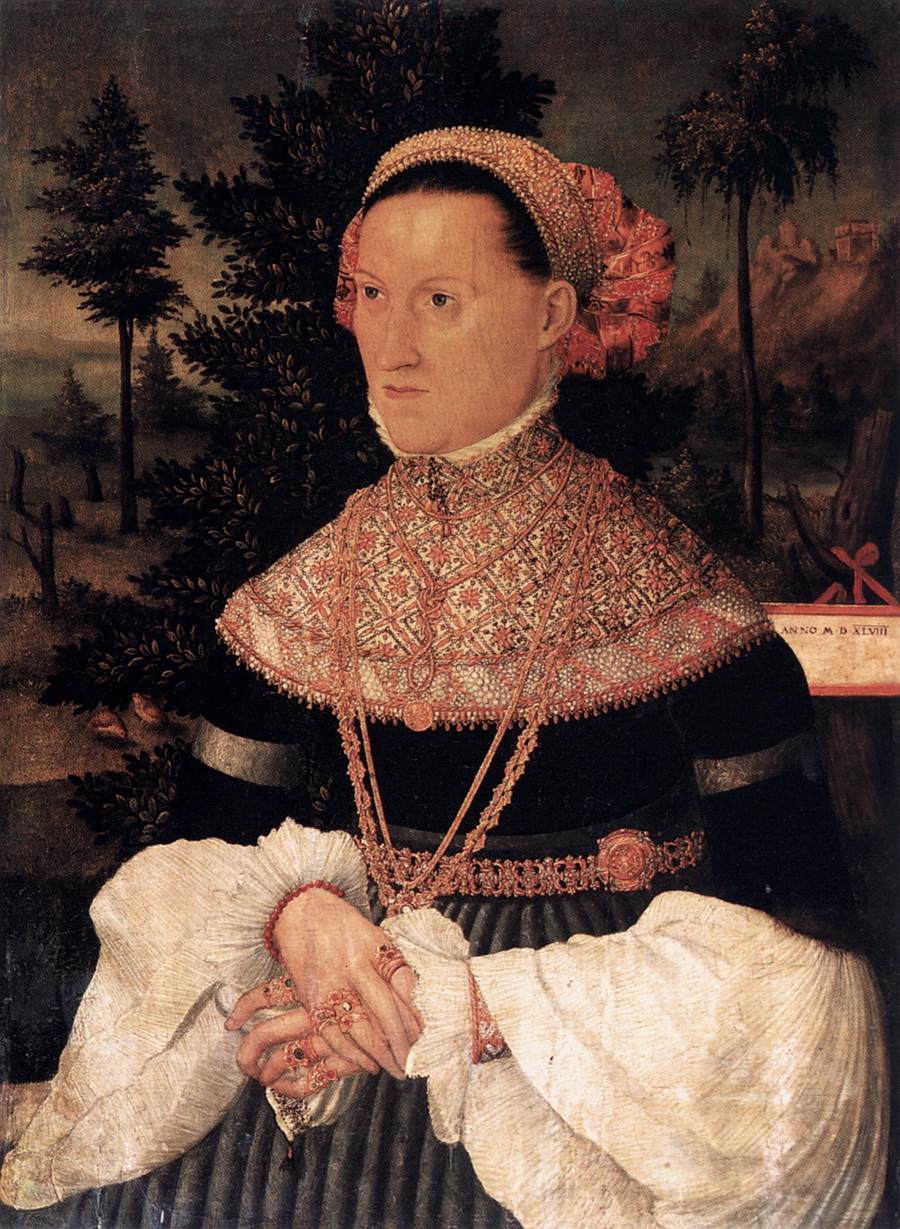
To start, I needed to estimate how many beads in the trim. So I counted the bottom row of the two sections that repeat in the pattern in the picture. I then times that by the number of repeats I could see (which was 5 approx). Using that number and a measure from point to point on myself, about 10cm down from my shoulder points approx where it would sit on me if I was to wear this, I was able to determine that the trim uses 4.5mm beads, approx. And that the trim is about 5cm wide (and 112cm long).

Having a look online and at the beads in my collection, I've altered the pattern to suit 3.5mm beads instead. I will have access to a greater number of bead colours and types using the slightly smaller ones. Which means that I have lengthened the pattern to fit all the bits in I want.


I've now worked out the pattern repeat with a nice design. I've kept the little triangles from the original in the first 'main' repeat, but instead of a flower I've gone with a mini laurel wreath. In the smaller 'spacer' repeat I've put in a pattern, or rather an initial. P for Portia (times two). Both things I think personalise this for her and look quite effective as well.

I've done the maths for the piece (which you can see at the bottom on the pic above) and added a key for the colours etc. Next step is to do a tester piece and see if the design looks good in reality as well as on paper.

Testing

In doing this test piece I have chosen beads in my collection that are onhand. The colours I've used are not representative of the final product. And I am still deciding what colours the border and the inner sections will be (though I am thinking white for the fill, and a black or brown for the border). I do intend to keep the colours as my pattern shows (for those with colours).

It has been awhile since I have done peyote stitch, so I am relearning what a pain starting it can be :) This time around, because this is a trim piece, I have ancored the starting row to a scrap of fabric which has helped alot. But you can certainly see my mistakes and muckups in the first little bit of the test piece (which is part of the point in doing a tester too).


Using the pins has helped me get this started too. However I do need some longer ones, which I will grab from the shops tomorrow. :)

So far it has taken me about 3-4 hours to get this far (with the planning and patterning too, I'm not that slow! :) ) and I see this taking many an evening to complete! There's still a bit to do before I cover one full pattern repeat, but I will post again when more is done.


Projects on the go - 1 Leather cloak

I have two 'major' projects on the go at the moment.

First is a small leather cloak motif for Mistress Leta. This is adapted from the 'pelican hat'.


As Mistress Leta doesn't have or intended to do any german garb, I've taken the motif and am going to adapt it onto the back of a small cloak for her. I am using a purple suede for the leather, which I also gave her as part of her stepping down (as Baroness) presents.

Current planning has it looking like this:


Just working out if I use a canvas layer underneath or not first. Either is actually period, I just need to decide whats easiest for me. :)

Once I get the 'sun' laid out I will then start on the pelican construction. I prefer to adapt the pelican size to the sun circle size than vice versa, as I am a little limited with the large pearls and they will be a bugger to match colourwise.

Thursday 29 March 2012

Okay. Looking back at the past.

I've done a number of different things in regards to beadwork over the last few years. My most beloved example is my handconstructed beaded snood for the then Baroness Leta.

Beaded Snood

Hand worked and freeform construction. This projected used 2mm round fake white pearl, 2mm round gold metal beads, 2mm red glass seed beads plus larger pearls and various sized red glass beads. Thread-wise I chose to use non-frey, non-rot beading thread for simple longevity. I do not want to replace the thread on this ever!! I could have used a reasonably heavy linen thread as well, but I wasn't taking any chances.

It was lined with a small hair net (to keep it out of her hair more than any other reason) and mounted onto a strip of tablet woven silk approx 15cms long and 1.5cm wide. Mistress Leta provided the braid for me as she is a tablet weaving junky. Pattern was from a very late 15C/early 16C source (which I don't have sorry).

We also sewed a hair comb into the front of the snood so that the weight wouldn't simply drag of her head. This was just a off the shelf plastic comb.

My estimate for the total number of beads used is around 1000. Yes, I am insane. It weighed around 300 to 400 grams.

All in all this took me 5 months to make. However construction hours are probably around the 50 mark in total work.


Obviously based around the Baronial device of the Griffin. The pic above is Mistress Leta wearing the final product for the first time at the Baronial 10th Anniversary.

I have my period evidence for this somewhere, so I will post that later. However more generally, snoods are period as is beading on snoods. Most 'beaded' snoods are ribbon with beading decoration sewn onto the ribbon/fabric or a full fabric snood with beaded trim and highlights.

This is a painting from 1458, you can see the beaded trim along the front of her 'snoodlet'.


The technicque I used for the flat construction was a combination of twill and woven beadwork. The griffin itself is twill work (also called peyote) whilst the beaded 'net' surrounding it is woven work. Peyote is a period construction technique for beadwork. It is more flexible than wovenwork as it moves along both the horizontal and vertical axis as well as the diagonal, where wovenwork is horizontal/vertical only. This allowed for a griffin that would form better to the back of the head and sit more naturally on a curved surface, as well as being a period technique.


The headband above is from a 1500 painting. There is a combination of wovenwork (along the top) and peyote (along the bottom).

Whilst wovenwork is much better know as a US Native American technique (done on a beading loom), it was occassionally used in period construction. From the evidence I have seen this seems to be where only a very small number of bead rows are required (for example the headband above uses it for 3 rows only). Having personally experimented with both styles, I can see exactly why as it is very very hard to maintain a proper shape with a small number of rows when doing peyote because of its flexibility. The beads have a tendancy to slip around far too much to maintain a small row number. So woven and twill can be used in different circumstances.

Alongside all of this, twill work can be very easily done off loom in hand where large rows of wovenwork MUST be constructed on a loom. Which in my mind makes twill a much better overall option as I can take it with me to events/A&S gatherings/whereever with great ease because all I need is a roll of thread, a needle, a pair of scissors and some beads to do work. All of which fit easily into a small pouch :)

I have seen no evidence in European sources for bead wovenwork in period done on a bead loom. The existance of those looms in Europe seems to only come about upon the expansion in the Americas.


Things that I learnt from this project and things I would do differently. 

Firstly, when beginning a project this big beadwise, make sure you have all your materials from the beginning! It was very difficult at one point to get some matching pearls through batch colourings. It took awhile to get these to blend in effectively and I ended up with quite a number of other shades. Not that me having more beads is a problem for me, but would have made the project a little faster and kept my motivation and attention alot more if I had purchased a bulk buy of the pearls at the start.

What I would do very differently would be the comb (which I may still replace) and I would make the hairnet by hand next time. I had originally decided to make the hairnet, but that lost out due to time pressures in getting it done for the event.

Sources:
The History of Beads: From 30,000 B.C. to the Present - Lois Sherr Dubin
Jewelry: From Antiquity to the Present - Clare Phillips
A History of Jewellery 1100-1870 - Joan Evans


Tuesday 27 March 2012

begin at the beginning

Hi. I'm Alex Rapp and this is your life...er or mine...

I am a member of SCA Lochac and currently reside in Polit (for 11 years now). SCA-wise I am known as Alexandra Hartshorne.

I am also on Facebook if people want to look me up.

My primary focus with the SCA has been that of service, and I am a happy autocrat for many events. I currently hold the Barony records for cancelling an event and still making a proft. :)

For many years I have done basic beaded jewellery and bead work. I've supplied jewellery to the two previous and the current B&B's, as well as a number of other members of the populous. My bead work has also been commissioned as gifts to other Baronys at the request of the B&B, and I've donated a number of bead related peices for Royal taxes.

I make lots of mundane beaded jewellery, with a number of friends being both feeders of this habit (by asking me to make things for them and providing me with the beads) and receivers of gifts and presents because "It was just so you!".

Anyways, I thought I might start looking at putting up some of my beading works both the completed projects as well as those in train.

Lets see how this goes!