Monday, 16 December 2013

Cheese bibliography

Someone asked me about my research resources for the cheese making processes. Below is what I've used as part of the pentathlon documentation. There is more, but this should be enough of a start :)

Some I used more than others, but all are at least good starting points for further investigations.


14th to 15th Century Soft Cheese, Cheesemaking, accessed Aug 2013,
http://www.cheesemaking.com/includes/modules/jwallace/onlinenews/feedbackpics/06_11/friends/pics/meidieval.pdf

Asiago, Finica, accessed Sept 2013, http://www.finica.com/productsDetail.php?Asiago-56

Asiago, Wisconsin Cheese, accessed Aug 2013, http://www.eatwisconsincheese.com/cheese/article.aspx?cid=4

Austin, T. (1888) Two Fifteenth-Century Cookery-Books. Harleian MS. 279 & Harl. MS. 4016, with extracts from Ashmole MS. 1429, Laud MS. 553, & Douce MS 55, London: for The Early English Text Society by N. Trübner & Co, accessed Sept 2013, http://www.archive.org/stream/twofifteenthcent00aust/twofifteenthcent00aust_djvu.txt

Blackie, M. (1994) Farmhouse Cooking, HarperCollins, NSW.

Bogucki, P. I. (1984) Ceramic sieves of the Linear Pottery culture and their economic implications, Oxf. J. Archaeol. 3, 1530.

Brien, A, Various, ChannelCheeseTV, accessed July 2013, http://www.youtube.com/watch?v=2iDIuth93hE

Brand, L (2004) Lime, accessed June 2013, http://www.openairclassroom.org.uk/Further%20information/information-lime.pdf

Carroll, R. (2002) Home Cheese Making, Storey, USA.

Cato, MP and Varro, MT (100BC) Roman Farm Management - The Treatises of Cato and Varro, Project Gutenberg, accessed Sept 2013, http://www.gutenberg.org/ebooks/12140

Cennini, Cennino (1954), The craftsman's handbook : the Italian Il libro dell'arte, Dover, New York.

Cheese: True (gut) Rennet vs. Microbial and other types, Comment: cheesemaestro, accessed Sept 2013, http://chowhound.chow.com/topics/881320

Cheeses, Rustic Cooking, accessed Aug 2013, http://www.rusticocooking.com/cheeses.htm

Cheesemaking, Ribe Viking Center, accessed Aug 2013, http://ribevikingecenter.dk/en/learn-more/food-cheese.aspx
Clarified Butter, Wikipedia, accessed Aug 2013, http://en.wikipedia.org/wiki/Clarified_butter

Copley M.S., Berstan R., Mukherjee, A.J., Dudd S.N., Straker V., Payne S. & Evershed R.R (2005) Dairying in antiquity: III - Evidence from absorbed lipid residues dating to the British Neolithic, Journal of Archaeological Science, 32: 523546.

Cornelii Taciti, P. (98AD) De Origine Et Situ Germanorum, accessed Aug 2013, http://www.laurentianum.de/lggerm02.htm

Craig, O & Chapman, J & Figler, A & Patay, P & Taylor, G & Collins, M. (2003) 'Milk Jugs' and other Myths of the Copper Age of Central Europe, European Journal of Archaeology, vol 6(3): 251-265.

Digby, K, The Closet of Sir Kenelm Digby Knight Opened, accessed June 2013, http://www.gutenberg.org/ebooks/16441

Grant, M. (2008) Roman Cookery: Ancient Recipes for Modern Kitchens, Serif, London.

Haloumi, Cyrus Food and Drinks, accessed Sept 2013, http://www.cyprusfoodndrinks.com/cgibin/hweb?-A=301&-V=b2b

Halloumi, Slow Food Foundation, accessed Sept 2013, http://www.slowfoodfoundation.com/ark/details/523/halloumi-

Halloumi, Wikipedia, accessed Aug 2013, http://en.wikipedia.org/wiki/Halloumi

Hard Cheese Recipe Booklet, Mad Millie, www.madmillie.com

Hayes, C. (2011) 'Galway butter find dates back to the Iron Age' Irish Central, accessed Sept 2013, http://www.irishcentral.com/news/Bog-Butter-find-believed-to-be-2500-years-old-121769889.html

Kindstedt, P. (2012) Cheese and Culture: A history of cheese and its place in western civilisation, Chelsea Green, USA.

Lorenzi, R. (2009) 3000 Year Old Butter Found in Ireland, NBCnews, accessed Aug 2013, http://www.nbcnews.com/id/32630695/ns/technology_and_science-science/t/-year-old-butter-discovered-ireland/#.Ue6iLqwpiHy

Mair, V and Hoh, E. (2009) The True History of Tea, Thames & Hudson, London.

Medieval Cheese, Blogspot, accessed April 2013, http://medievalcheese.blogspot.com.au/

Medieval Cheese, Facebook, accessed April 2013, https://www.facebook.com/Medievalcheese

Mendelson, A. (2008) The Suprising Story of Milk Through the Ages, Alfred A Knopf, New York.

Myrdal, J and Fenton, A, (1988) The Plunge Churn from Ireland to Tibet: Food and drink and travelling accessories: In honorem Gosta Berg, Edinburgh, P191-212

Outram, A & Stear, N & Bendrey, R & Olsen, S & Kasparov, A & Zaibert, V & Thorpe, N & Evershead, R, (2009) The Earliest Horse Harnessing and Milking, Science Magazine, vol 323, P1332-1335.

Quicklime, Wikihow, accessed Aug 2013, http://www.wikihow.com/Make-Quicklime

Scappi, B., Opera : (dell' arte del cucinare). Reprint. First published: Opera di M. Bartolomeo Scappi. Venice, 1570. 1981, Bologna: Arnaldo Forni. [20], 436 leaves [ca. 888 p.], [28] p. of plates. translated by  Louise Smithson, (Helewyse de Birkestad) February 2011, accessed July 2013, http://dir.groups.yahoo.com/group/scacooksitalian/message/289

Swaminathan, N (2012) A Pre-historic Cocktail Party, Archaeological Institute of America, accessed March 2013, www.archaeology.org

Theophilus P.;Hendrie R. (1847) An essay upon various arts, in three books, John Murray, London
http://archive.org/details/theophiliquietr01hendgoog accessed May 2013

Thistle Rennet Cheese, Culture Cheese Mag, accessed Sept 2013, http://www.culturecheesemag.com/style/spring_2010/thistle_rennet_cheese

Various, Cheese.com, accessed Aug 2013, http://www.cheese.com/

Visit to an Italian Asiago Cheese Factory, Recipe Girl Blog, accessed Aug 2013, http://www.recipegirl.com/2010/06/09/visit-to-an-italian-asiago-cheese-factory/

Waxing the Round, Essential Stuff, accessed Aug 2013, http://essentialstuff.org/index.php/2011/06/06/Cat/cheese-making-waxing-the-round/

Sunday, 8 December 2013

Beaded Banner again...

The medium sized motifs morphed into a new design as I was beading :) But first motif is finished, now to repeat 19 more times...


Ale Cheese


Writer: Alex
Participants: Alex, Clare
Items: Milk, Flax as Linen, Honeycomb as honey, mead and beeswax

The Ale Cheese documentation written by Sister Waldetrudis von Metten (SCA Persona) cites Columella (70AD) as one of their references for this modern redaction. She specifically mentions that Columella talks about adding flavours to cheese "you can give the cheese any flavour you like by adding any seasoning which you choose." She also cites Two Fifteenth-century Cookery Books (1430) which has 'A Potage for Fysshday', which begins by "Make a stiff Posset of Milk and Ale; then take & draw the curds through a strainer".

In using this recipe for the Ale Cheese, the period source recipe stops at the soft cheese step. Waldetrudis has taken that a step beyond and also created a pressed hard version of the cheese. It is quite possible that there were versions of Ale Cheese which also had pressing stages but were easily not documented. Cheese recipes, and particularly those mentioning a pressing process, can be uncommon.

Equipment
Large pot or water bath
Slotted spoon
Cheese thermometer
Cheese press
Fine muslin cheese cloth (or linen)
Colander or curd strainer
Cheese mat
Cheese wax
large bowl
Ingredients
6Lt pasteurised, unhomogenised cows milk
3/4 packet of Mesophilic starter culture
1.5 tablets of rennet (vegetarian in this case)
1/4 cup of unchlorinated spring water
3ml calcium chloride
750ml Ale
190ml Mead
250ml Honey
1tsp each of cinnamon, ginger, cloves and nutmeg
1Tbsp cheese salt

Mead Please see Appendix A
Ale Please see Appendix B

Method

  • slowly heat milk to 32oC (around 30 minutes)
  • add calcium chloride and gently stir for 1 minute
  • add starter culture and stir slowly from top to bottom for 1 minute
  • add 650ml of ale
  • cover and leave to ripen for 60 minutes at 32oC
  • dilute the rennet in the spring water making sure it is thoroughly dispersed
  • add rennet to milk and stir gently for 4 minutes
  • cover and sit for 45mins (or until a clean break) at 32oC
  • cut the curd into 1/2 inch cubes and leave to rest for 5 minutes
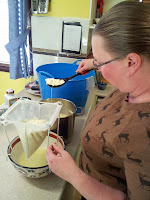
  • gently ladle into curd strainer and leave to drain overnight (16 hours)
  • place curd into a large bowl and add remaining ale, mead, honey and spices
  • cover and refrigerate for 24 hours

At this point the soft cheese version is finished and can be eaten now. However, a hard cheese can be made if you continue to follow the instructions below.

  • line your cheese press with the muslin
  • scoop the curd into the press using a slotted spoon
  • cover with muslin and insert the follower
  • press at 7kg for 15 minutes
  • remove cheese from press, undress, flip, redress and return to the press
  • repeat for 2h 45m (or a further 11 times)
  • remove cheese from press, undress, flip, redress and return to the press
  • press at 14kg for 30 minutes
  • remove cheese from press, undress, flip, redress and return to the press
  • press at 14kg for 30 minutes
  • remove cheese from press, undress, flip, redress and return to the press
  • press at 14kg for 12 hours
  • remove the cheese from the press and undress
  • place cheese on cheese mat and keep at 16oC
  • turn once a day for 2-4 days until rind forms
  • once the rind is formed, wipe the surface with a piece of muslin dipped in some ale and honey mixed with a little salt
  • turn once a day for 10-14 days
  • wrap in waxed paper and seal after 14 days

Specific Photos


Adding the ale to the inoculated milk


Cat proofing for overnight draining and the morning after


 Assembling the ingredients and mixing them together


 Hard version                                         


 Soft version


Wrapping the cheese in the waxed-linen and sealing with wax


Final package.

Notes

  • The milk and ale ripening smells awesome!
  • The curd which set from this process has to have been the cleanest yet. It was amazing in keeping its size and texture.
  • It was wonderful to be able to use the mead we had made earlier in the pentathlon.
  • Ale was supplied by the wonderful Master Drakey. After I described what was needed he sent me Lady Hombley's Scotch Ale from Sir Kenelm Digby - 1669. Which is an unhopped ale and that's what the recipe called for, reference and recipe in Appendix B.
  • Breaking up the cheese after it had drained overnight was very similar to the Bra, where it was quite hard and solid. It took some effort to break into pieces small enough to feel comfortable marinating. And that was from simply hanging draining, not pressing like with the Bra.
  • After marinating the cheese had absorbed a lot of the liquid. It was very cottage cheese in texture, which is why the soft cheese version probably stops here.
  • Tasted the cheese at the soft version point (just prior to pressing). Wow! You can really taste all the different flavours.
  • The original amount of marinated cheese added to the press was at about 20cm high. At the end of pressing it was about 10cm high. This just demonstrates how much liquid can be absorbed and removed from a soft cheese. The round produced was a lot larger than other rounds that have been made, presumably this is because of the added liquids as well as the honey.
  • Rather than use modern waxed paper, we chose to make a waxed linen cover for the cheese. Documentation and process for making these covers will be included in our final submission - Flax.
  • When I do this recipe again there is one thing I would do differently.  The number of times the cheese is pressed at 7kg (11 times) is excessive. By the end of the 6th or 7th pressing no significant amounts of whey was expressed and the shape/feel/density of the round had not changed. So I think you can easily cut several of these pressings.
In further experiments I also want to try flavouring with apple cider, apple schnapps and cinnamon. Amongst other flavours.


From Sew & Swear submission 2: Honeycomb documentation


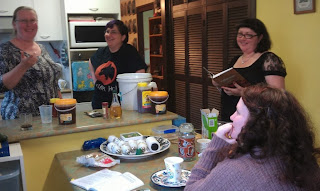
Participants – Clare, Alex, Fiona, Ashan, Georgia
Writer – Alex

Team items featured: honey; linen (flax).

Mead Day!
We had a group mead day were we produced both the Syr Michael of York mead and the Savelli mead. There may be some crossover of photos!


Original Recipe

This recipe was taken from Master Terafan Greydragon's website.

Syr Michael of York Mead
Boil one gallon of water with 2.5 lbs of honey. Add juice of one lemon and ½ tsp nutmeg. Boil, skimming foam, until it stops foaming. Let it cool to blood temperature, then pitch yeast. Let it work two weeks, bottle it and let it age two weeks. THEN PUT IT IN THE REFRIGERATOR, AS IT CAN BECOME EXPLOSIVE IF LEFT OUT AFTER THIS.

Redacted Recipe

4g of wine yeast
500g of honey (Coles brand)
1.5L of water
20ml of fresh lemon juice
1/2tsp of nutmeg

Steps Taken

  1. We boiled the water on the stove top and then added the honey, lemon juice and nutmeg.

  1. The mixture was skimmed until it produced no more scum. This took about a half hour.


  1. We then let it cool to 'blood temperature'.

  1. We pitched the yeast and bottled the mead.


On the left is Clare’s mead (Savelli) and on the right my mead, Syr Michael of York.


  1. After leaving it for 4 weeks, the mead was then strained through a linen cloth and bottled. The bottles were then refrigerated.


Notes and Lessons Learnt:

  • When skimming the honey, we quickly discovered that it was best to stir the mixture rapidly to form a whirlpool in the centre of the pot before skimming. This worked to gather all the foam in one location which made it easier to scoop out.

  • The recipe says to ‘let it work 2 weeks’. Due to personal circumstances I 'let it work' for 4 weeks. I do not understand exactly how this may effect the brew, however it doesn’t seem to have affected the taste to my plebeian palate.

  • Master Drakey advised that the mead would be adversely affected by exposure to sunlight. To this end my mead lived inside a blue cold shopping bag. This both kept it from sunlight and helped maintain a consistent temperature. Both were considered important for a positive outcome!


Bibliography

Greydragon, Master Rhys Terafan (2008), “Honeys and there affect of mead”, Greydragon Library http://www.greydragon.org/library/honey.html  accessed Jan 2013

Making Mead: The Art and the Science, The National Honey Board, USA, http://www.honey.com/images/downloads/makingmead.pdf (accessed May 2013)


Appendix B


Lady Hombley's Scotch Ale from Sir Kenelm Digby - 1669. p98-100

Provided by Master Drake
SCOTCH ALE FROM MY LADY HOLMBEY
The Excellent Scotch Ale is made thus. Heat Spring-water; it must not boil, but be ready to boil, which you will know by leaping up in bubbles. Then pour it to the Malt; but by little and little, stirring them strongly together all the while they are mingling. When all the water is in, it must be so proportioned that it be very thick. Then cover the vessel well with a thick Mat made on purpose with a hole for the stick, and that with Coverlets and Blankets to keep in all the heat. After three or four hours, let it run out by the stick (putting new heated water upon the Malt, if you please, for small Ale or Beer) into a Hogshead with the head out. There let it stand till it begin to blink, and grow long like thin Syrup. If you let it stay too long, and grow too thick, it will be sowre. Then put it again into the Caldron, and boil it an hour or an hour and a half. Then put it into a Woodden-vessel to cool, which will require near forty hours for a hogshead. Then pour it off gently from the settling. This quantity (of a hogshead) will require better then a quart of the best Ale-barm, which you must put to it thus. Put it to about three quarts of wort, and stir it, to make it work well. When the barm is risen quick scum it off to put to the rest of the wort by degrees. The remaining Liquor (that is the three quarts) will have drawn into it all the heavy dregs of the barm, and you may put it to the Ale of the second running, but not to this. Put the barm, you have scummed off (which will be at least a quart) to about two gallons of the wort, and stir it to make that rise and work. Then put two Gallons more to it. Doing thus at several times, till all be mingled, which will require a whole day to do. Cover it close, and let it work, till it be at it's height, and begin to fall, which may require ten or twelve hours, or more. Watch this well, least it sink too much, for then it will be dead. Then scum off the thickest part of the barm, and run your Ale into the hogshead, leaving all the bung open a day or two. Then lay a strong Paper upon it, to keep the clay from falling in, that you must then lay upon it, in which you must make a little hole to let it work out. You must have some of the same Liquor to fill it up, as it works over. When it hath done working, stop it up very close, and keep it in a very cold Cellar. It will be fit to broach after a year; and be very clear and sweet and pleasant, and will continue a year longer drawing; and the last glass full be as pure and as quick as the first. You begin to broach it high. Let your Cask have served for Sweet-wine.
Bibliography

Digby, K, The Closet of Sir Kenelm Digby Knight Opened, accessed June 2013, http://www.gutenberg.org/ebooks/16441


Thursday, 5 December 2013

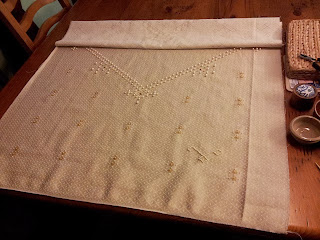
Update on the Beaded Banner

Just a quick update on the banner. I've now finished the small decorations on one half of the banner and have decided to work on the small diamond-shaped motifs that go around and between them.


This is what I am planning for the motifs. Still working out the something that will be in the centre. I think something gold and shiney will look nice. :)

You can see the placement of the full motifs above (and all the small decorations now finished!). There is a "border" of them around the end of the fabric too, but slightly cut down.


And I have begun! Doing this full one to decide if I truely do like the motif design. That way if I don't it's easy to unpick and redo!

Will be a bit slowly slowly, but will look awesome when its done.

Monday, 2 December 2013

Pentathlon Complete

cue *We are the Champions* slow-mo running sequence.

You might have guessed already, but we won!!!! I am super impressed by our win. We had totally awesome competition in the end, two teams of highly intimidating (jk) Laurels!! And we won! squeee!!!!

There are a whole bunch of our entries that I am going to post up when I get the chance. I counted and we did a total of 31 individual projects for this, making it about 1 project per 1.5 weeks for the length of the pentathlon. So blogging has been a bit slow 'cause of awesome stuffness!

To top off the win on a personal note, I'm now the Baronial A&S Champion for the next year. PLUS was given a star and lily at the same event all this was announced.

More posts to come, once my brain has stopped running round in circles squealing like a little girl...

Monday, 28 October 2013

Asiago


Writer: Alex
Participants: Alex, Clare
Items: Milk, Flax as Linen

The Mad Millie hard cheese kit came with this recipe for Asiago. Having checked against other recipes (Carroll, CheeseTV) there are some specific discrepancies which are not reflected in either of these batches (having found them after making the cheese).

Discrepancies:
According to some sources (CheeseTV, various websites) asiago is a brined cheese which is waxed. This recipe does not require you to do either.

Asiago is a town in the Vicenza  province of Italy. It is a protected Designation of Origin cheese, which means only true asiago cheese can be produced there. It is a high alpine pastured cheese, originally produced using sheep milk.

Asiago is an unpressed hard cheese, which means that it can be moulded into a number of shapes. It is often used as a substitute for parmesan because of its similar sharp taste, and it's aging time is much quicker (3months compared with parmesans 2years). The flavour of Asiago is indicated through the colour of the wax; Clear or White = mild (1-2 months), Brown = medium (2-6 months) and Black = aged (6-12 months).

Equipment
Large pot or water bath
Slotted spoon
Metal whisk
Cheese thermometer
Fine muslin cheese cloth (or linen)
Cheese mould
Cheese mat
Ingredients
6Lt pasteurised, unhomogenised cows milk
1/4 packet of Thermophilic starter culture
2 tablets of rennet (vegetarian in this case)
1/4 cup of unchlorinated spring water
3ml calcium chloride
1 tbsp of cheese salt

Method

  • slowly heat milk to 32oC (around 30mins)
  • add calcium chloride
  • add starter culture and stir slowly from top to bottom for 1 minute
  • cover and leave to rest for 30minutes
  • dilute the rennet in the spring water making sure it is thoroughly dispersed
  • maintaining a temperature of 32oC, add rennet to milk
  • stir slowly for 1minute
  • maintaining a temperature of 32oC, cover and sit for 1hour (or until a clean break)
  • cut the curd into 5mm cubes
  • stir with a metal whisk to make sure the curds break into even sized pieces
  • heat slowly to 38oC over 30minutes
  • let the curd rest at 38oC for 40 minutes
  • line your cheese mould with the muslin
  • gently scoop the curd into the mould using a slotted spoon to remove as much whey as possible
  • press firmly into the mould with your hands
  • cover with muslin and leave to drain overnight (16hours)
  • gently remove the cheese from the mould and undress
  • salt top and bottom surfaces and place cheese on cheese mat
  • keep at 16oC turning the cheese every other day
  • if mould forms, wipe the surface with a piece of muslin dipped in the brine solution
  • a rind should form in 3-4weeks
  • keep turning the cheese every other day until mature (2-4months)

Specific Photos


Large round aged and waxed


Moulded heart aged and waxed


The failed round. You can see where the mould worked its way into the pitting around the edges.

Notes

  • The initial temperature was easily achieved, however we had trouble with the second rise where the temperature stubbornly stayed at 42oC.
  • The first batch of asiago was very soggy and I ended up salting it twice to help draw out the liquid. It needed to sit on a cheese mat over a tray to collect the excess moisture for a week and a half.
  • When the discrepancies between this recipe and others was discovered it was decided that we would wax this cheese as the others call for. At that point it was too late to brine the cheese as the rind was already in the process of forming anyway. In any future attempts at this cheese I will look at including the brining process.
  • Whilst the setting milk was overheated, the temperature was still in the working range for the thermophilic starter. So there should be little impact on the final product. 
  • Two sets of Asiago were made. The first was firmly pressed into the mould, the second not as firmly. The second set of cheese (one heart shaped and one round) were a nightmare to keep clean and eventually the second round simply failed due to the amount of mould growth. Because the round wasn't as firmly pressed into the mould, the sides had ragged edges which allowed mould to grow and made it very, very difficult to properly clean. This failed round has been saved to be used as part of the cheese glue process because the mould should not pose too much of a problem, unless you eat paste...

Bra cheese


Writer: Alex
Participants: Alex
Items: Milk, Flax as Linen

The Mad Millie hard cheese kit came with this recipe for Bra. Having checked against other recipes (Carroll, CheeseTV) and it seems a fairly standard.

The type of Bra cheese is named for the length of time it ages. Bra Duro is aged 6 or more months, whilst Bra Tenero is aged between 2-3months. This cheese will be a Bra Tenero. Mad Millie says that this cheese originates from Bra Cuneo a town in Italy and comments from the town itself on the cheese are "it has always been made here, we have never made other types of cheeses."

Equipment
Large pot or water bath
Slotted spoon
Cheese thermometer
Cheese press
Fine muslin cheese cloth (or linen)
Cheese mat
large bowl
Ingredients
5Lt low fat pasteurised, unhomogenised cows milk
1Lt pasteurised, unhomogenised goats milk
1/4 packet of Thermophilic starter culture
2 tablets of rennet (vegetarian in this case)
1/4 cup of unchlorinated spring water
3ml calcium chloride
1-2Lt 25% brine solution

Method

  • slowly heat milk to 33oC (around 30mins)
  • add calcium chloride
  • add starter culture and stir slowly from top to bottom for 1 minute
  • cover and leave to ripen for 40minutes, keeping at 33oC
  • dilute the rennet in the spring water making sure it is thoroughly dispersed
  • add rennet to milk and stir for 1 minute
  • leave the milk to set for 45mins (or until a clean break) at 33oC
  • cut the curd into 5mm cubes using a whisk if required
  • slowly raise the temperature to 38oC over 30minutes, stirring constantly with a whisk making sure the curds stay in 5mm cubes
  • line your cheese press with the muslin
  • drain as much whey as possible
  • gently scoop the curd into the press using a slotted spoon to remove as much whey as possible
  • cover with muslin and insert the follower
  • press at 5kg for 10minutes
  • remove the cheese from press and undress
  • using your hands crumble the curd into small pieces in a bowl
  • reline your press with the muslin and repack the curd
  • cover with muslin and insert the follower
  • press at 8kg for 15minutes
  • remove the cheese from press and undress
  • using your hands crumble the curd into small pieces in a bowl
  • reline your press with the muslin and repack the curd
  • cover with muslin and insert the follower
  • press at 20kg for 24hours
  • fill a corrosion resistant bowl with the 25% brine solution
  • remove the cheese from the press and undress
  • place the cheese in the brine solution for 24hours, flipping ever 6hours for even coverage
  • remove from brine and pat dry with paper towel or clean muslin
  • place cheese on cheese mat and keep at 10-16oC
  • turn the cheese daily for 2 weeks
  • if mould forms, wipe the surface with a piece of muslin dipped in the brine solution
  • turn the cheese and wipe with brine once a week until mature (2-12 months)

Specific Photos


Aging with a thick rind. You can see the results of crumbling the curd.

Notes

  • The recipe calls for low fat milk, or to skim the cream off regular unhomogenised milk. I skimmed the milk removing 1/3 of the cream as suggested.
  • This is a mixed milk recipe, but can be made with only cow’s milk or with sheep’s milk instead of goats. Goat’s milk was added to this version.
  • The goat’s milk made quite a difference to the curd. Making it finer and slightly more delicate as other recipes suggest.
  • Crumbling the curd between pressings was interesting. In the short time of pressing it became quite firm and was difficult to break apart. The second time even more so. The crumbling also seems to have reduced the size of the cheese compared to other cheese with the same quantity of milk. 
  • I am very disappointed with myself for not getting any photos of the crumbling process.

Haloumi


Writer: Alex
Participants: Alex
Items: Milk, Flax as Linen

Haloumi is a Cypriot pickled cheese. This one comes from the Ricki Carroll Home Cheese Making Book, and is very similar to other recipes I have seen.

The pickling process means that haloumi keeps for quite some time regardless of the temperature. This allows it to be easily stored and used in hot weather regions, such as Cyprus where it was first made. It has a high melting point, which makes it wonderful for frying in a pan.

Traditionally haloumi was made with sheep milk. As mentioned previously under the Hard Goats Cheese entry sourcing sheep milk is problematic. There are a number of modern recipes made with cows milk.

A number of sources indicate haloumi has been produced in Cyprus since the medieval Byzantium period around 395-11911AD. Florio Bustron mentions halloumi specifically in 1554AD.

Equipment
Large pot or water bath
Slotted spoon
Cheese thermometer
Colander
Fine muslin cheese cloth (or linen)
Large bowl
Cheese press
Ingredients
6Lt unhomogenised cows milk
1 tablet of rennet
3/4 a packet of Mesophilic starter
100g cheese salt
3ml calcium chloride
1/4 cup of unchlorinated water

Brine:
900g of cheese salt
4Lt cold water

Method

  • slowly heat milk to 30oC (around 30 minutes)
  • add calcium chloride and gently stir for 1 minute
  • add starter culture and stir slowly from top to bottom for 1 minute
  • dilute rennet in unchlorinated water and add to milk
  • cover and leave to ripen at 30oC for 45 minutes
  • When you achieve a clean break, cut the curd into 1/2 inch cubes
  • slowly increase the temperature to 40oC (2o every 5 minutes) stirring gently to the curd does not matt.
  • maintain 40oC for 20 minutes
  • line your colander with the muslin
  • gently scoop the curd into the muslin using a slotted spoon, reserving the whey
  • line your cheese press with muslin
  • transfer the curd from the colander to the cheese press
  • cover with muslin, add the follower and press for 1 hour at 13kg
  • remove the cheese, undress, flip and redress.
  • put back into the press (with muslin and follower) for 1/2 hour at 22kg
  • remove from press and undress
  • cut the cheese into 3inch cubes
  • heat the reserved whey to 80-90oC
  • place the curd in the whey and soak for 1 hour
  • when the curd is the look of poached chicken remove and strain into a colander
  • allow to cool for 20 minutes
  • sprinkle the curd with 100g of salt and further cool for 2-4 hours
  • combine 900g of salt and 4Lt of cold water to make brine
  • add the cheese to the brine
  • cheese will keep up to 60 days.

Specific Photos


Reserving the whey for cooking the pressed cheese in


Final product in brine and fried for taste testing. Yum!

Notes

  • Temperature control is not my friend. Initially rose to 38oC during ripening because I did not close the curtain (the sun was at the right/wrong angle and kept warming the pot). I finally noticed and managed to get the temperature back to 32oC, which was still a little high but much better.
  • The original recipe calls for 1/2 a tablet of rennet. After letting the milk ripen for 1.25 hours without it setting I decided to add the other half of the tablet (most of my other recipes as well as the instructions on the rennet tablet packet say that 1 tablet should be used for 4Lt of milk). After doing this, it took an additional 25 minutes to ripen to a clean break.
  • The final pressing of the cheese calls for 22kg. My little press is only marked to 20kg, so I guesstimated where 22kg would be.
  • Haloumi is both a salted and brined cheese, which can make the final product quite salty in taste.
  • The brine that this recipe calls for is the same ratios as the brine for soaking the Gouda and other hard cheeses. I am a little perplexed as to why it calls for a cold brine infusion, rather than make it the day before and allow it to cool overnight, but followed the instructions anyway. Next time I think I will make the brine the day before to save the tediousness of making it cold (took an hour to infuse). 
  • Tasting the cheese in the end was very salty, which was expected. We fried a batch without washing/rinsing and also fried a batch rinsed. The rinsed batch was certainly less salty, and I would think that letting it soak in clean water for a half hour before frying would reduce the salt content considerably again.